Most of the old generation Android phones come with a ridiculous 200-400 megabytes of internal storage which begins to cause problem after you install a handful of applications and games. Fortunately, there is a possible way to increase the internal storage of your Android phone if you can root it in any way.

How Does it Work?

You can’t obviously increase your internal memory literally. But you can allow your Android to use some of your SD card’s storage to use as internal memory to install applications and games directly. This helps you keep your phone running at an excellent condition as well as let you install as many games and apps as you wish.
To take advantage of this trick, we’re going to need two things:
  • A rooted Android phone;
  • Link2SD application

Rooted Android Phone

Rooting Android phones is not a rocket science. There is an instruction on rooting almost any phone you want to root. Check below links for the detail on how to root your Android device.
When you’ve successfully rooted your Android phone, you’re ready to move to the second phase.

Link2SD

Link2SDBasically, Link2SD is an application that works best on rooted phones. It installs all the games and applications (except system apps that have to remain on the phone memory) on SD card’s second partition (that you have to create) and link them. This way, you can easily install apps and games way beyond that ridiculous 200-400 megabytes of internal storage your phone has. Another benefit of using link2SD is that you will not lose any running application when you connect the SD card to your computer. Because each time SD card is connected, only the first partition will be connected (mounted) to the PC leaving the second partition running smoothly on your device.
So, let’s begin by partitioning your SD card.

Step 1: How to Create a second partition on your MicroSD card

A second partition on your SD card can be created in two ways: via ClockWorkMod (CWM) recovery and via MiniTool Windows application. For your convenience, I will cover both ways in detailed instructions below.
Before you do anything, make 100% sure to back up your SD card fully to your computer. There’s a chance of messing things up and you may end up losing all your SD card’s data. If all hell breaks loose, you will want to restore every bit of data that’s stored on your SD card.

How to Partitioning using CWM Recovery

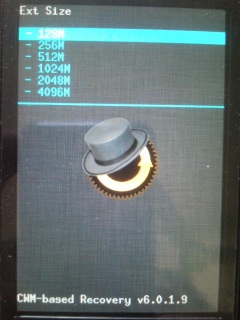
First, enter the CWM recovery mode. It’s usually entered by powering off your phone and powering on while pressing down volume button and the power button at the same time until you see the following screen.

Now, go to the Advanced Menu from CWM recovery options.

Go to Partition SD card option. Select ext and 512 MB or 1024 MB. It’s up to you how much space you want to give to your second partition.

Now you’ll see that your SD card is being partitioned. Wait a few moments. This should take a little while.

Once you see “Partitioning Done!” message, reboot your device and Restore your data from the backup you had taken before proceeding.
Now, if you don’t have CWM recovery on your device or if you can’t find Partition SD card on your CWM menu, feel free to check out this alternative way. You will need a Windows computer for the following tool to work.

Partition Using MiniTool

  1. First you have to download Mini Tool Partition Wizard Manager. Download MiniTool Partition Wizard Home Edition from here.
  2. Insert your SD card to a Card Reader and open it on your computer.
  3. Back up all your files to the computer because partitioning will wipe your data.
  4. Install and Open Mini Tool in your computer. Locate your SD card (be careful in choosing and make sure not to choose the drive on your computer)
  5. Right click and choose Delete.link2sd 3

  • Right click on it again and select “Create New” on that drive letter.
  • Select “Primary”.
  • If the size is less than 2GB, select file system FAT. If it’s more than 2GB, select FAT32.
  • Do not select the whole card as partition size. Turn the slider to the left and leave some space on “unallocated space”. This will be the second “EXT” partition on your SD card.
  • Now, choose the unallocated space again and select "Create New" and also choose " Primary".
  • Now, choose EXT2 file system. You can let the whole space take over in this step.

Now, click OK and then click the Apply button from the top left of the window. It might take some time for the operation to finish.
Once done, restore the data to your SD card. On Windows, you will always get connected to the first partition of your SD card because Windows does not recognize the ext2 file system which is the second partition on your SD card for installing apps and games.
On Linux, though, make sure to restore your data to the drive that is significantly larger. Because your second partition is always the smaller one and you don’t want to fill up your second partition with media files!
At this point, you have just finished partitioning your SD card. Congratulations! Now you just need to configure Link2SD to connect to this second partition and link apps and games.

Configuring Link2SD

Now is the time to download and install Link2SD application from Google Play Store on your Android phone. Once installed, run the application. You may see a screen asking for Superuser Permission (root permission) the first time you run it. Make sure to select “Remember” and press Allow/Grant.
Note that if you don’t see this prompt, your phone is probably not rooted. In that case, you have to Google on how to root your phone! Without root permission, this will not work.


On successful launch after gaining root permission. Link2SD will ask you to select the file system of your second permission. We remember we set it as ext2. So, ext2 it is.

Upon OK-ing, your device will need to be restarted.

Upon restarting your phone, open Link2SD again and a dialogue will show up. Press OK and click the icon you see on the screenshot below. Choose On Internal. This will show up a list of apps and games installed on the internal storage of your phone.

Now select options and choose multi-select. Then press the select all button. All of these apps will be selected.

Now, click Actions and then choose Create link.

Check all three boxes and touch OK.

Link2SD will now take a little time to move all these apps and games (except system files) and create a link with them from the second partition of your SD card. Touch OK when done.

Almost done! Now, to make sure that every time you download something, it gets auto-linked to the second partition, do the following:
Go to settings from the Menu.

Touch Auto Link.

Check all three checkboxe and you’re done. You’ll no longer have to worry about the ridiculously low internal storage on your Android device.
To see the storage status of your second partition, you can always go to storage info within Link2SD application.

Other Things to Know

  1. Now that your SD card has been linked as internal storage, remember never to take out your SD card because that way, a lot — if not all — applications will stop working immediately.
  2. You can also choose ext3, ext4 or even FAT as a file system on your second partition. However, ext2 works faster on Link2SD than any other file system.
I hope you are already feeling way too happy for making a purchase of an Android phone that lets you do almost anything you can imagine!
Are you happy with your Android purchase? Let us know in the comments and feel free to share/like this post with your friends and family. Enjoy! :)

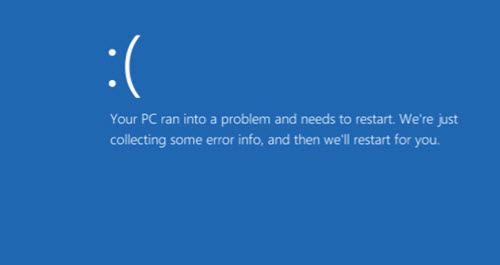
According to the Microsoft report there are more than 75 million computers using Windows 10. But have you ever got some reboot on playing games, playing videos on YouTube, etc. This is the  common problem faced by many user of Windows 10. For example while using you get a blue screen with sad face pops up saying some error message like “Memory Management Error” or “Boot_Config Error” and many more. Here’s the solution for some the errors.Your-PC-Ran-Into-A-Problem-And-Needs-To-Restart

The error in the above image is due corrupted system files. In Windows there’s a System file checker Tool inbuilt which scans your windows system file for corruption or any other changes. This tools checks and replace any of the modified file with the correct version.

Steps To Repair Corrupted Windows 10 System Files

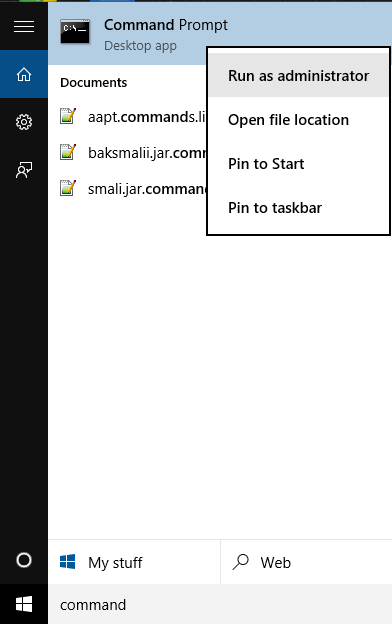
  1. We will be using “Command prompt” for this. Type Command prompt in the windows search bar. Then right click on it and select “Run as administrator“.
    Run Command Prompt as Administrator
    Run Command Prompt as Administrator
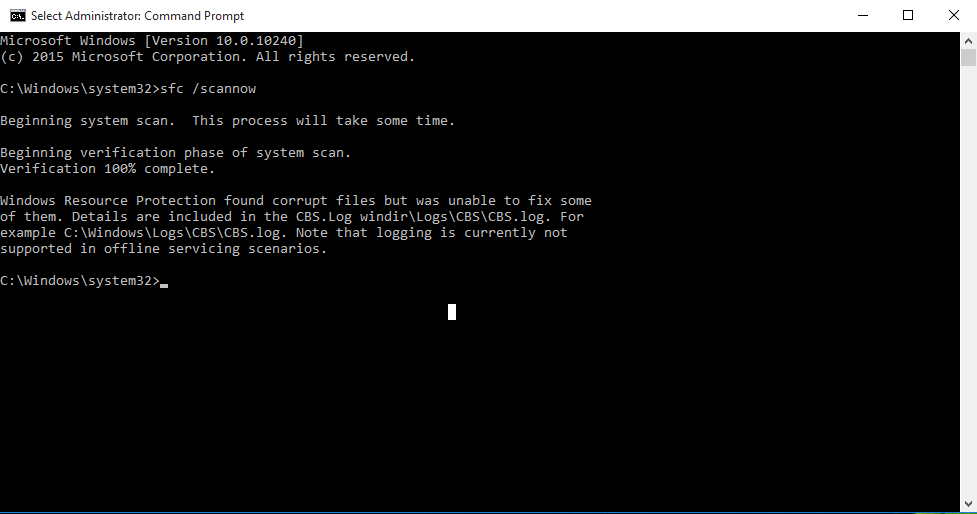
  2. In the command prompt window type ” sfc /scannow” and hit Enter.
  3. The system scan will start and verify all files. This process takes time about 15 minutes.
  4. After the verification is finished it displays the result. If it give you some Error then check the log in the specified directory.Screenshot (86)
For better understanding check this video tutorial.
The above image was for my case. I checked the log and it showed that it had repaired mostly everything but could not fix some of them. But was fine. Now there were no reboots.
The result will be different for you. Try it and tell if it fixed the reboot or not. 😀
All the Android One users who have updated their phone to Android v6.0 i.e. updated to Marshmallow might have lost the root access.  Now you will need to root your device again to do system modifications. Android One users will need to flash the Zeus kernel and Super SU.zip via TWRP. So here’s a step by step guide to root Android One devices which are updated to Android 6.0.


Required Files
  1. Zeus Kernel – Download
  2. SuperSU.zip – Download

List of Andorid One devices Supported by Zeus Kernel

Android one logo
  1. Micromax Canvas A1
  2. Karbonn Sparkle V
  3. Spice Dream UNO
  4. MyPhone Uno
  5. Symphony Roar A50
  6. Cherry Mobile One
  7. Nexian Journey One
  8. Mito Impact
  9. Evercross One X

Prepare Your Device

  1. Custom Recovery like TWRP should be installed on your device.
  2. Your device must be fully charged or at least have 80% battery charge on it, as the process drains-out battery. If you don’t have enough charge then it could cause the device to shut down unexpectedly and break the rooting process, which could permanently damage the device.
  3. Take a backup of all your Important Data and Settings to prevent unexpected loss, as this process might wipe out all your data.
We are not responsible if your device is damaged. Root your device at your own risk. Rooting your device will VOID the warranty of device

Steps To Root Android One

  1. Copy the downloaded Zeus Kernel and SuperSU.zip to your device internal storage or external storage.
  2. Now reboot your device in Recovery. To reboot your device to recovery, Power off your device, and then press and hold volume down and power keys together. Then choose recovery option when prompted.
  3. Take a nandroid backup of System, Data, Boot, Recovery & EFS partitions. Wait until the backup process completes. This may take some time.
  4. Now hit the “Install” option and browse the Zeus Kernel file and select it.
  5. Just swipe for the installing the kernel.
  6. After installing the kernel, now again select “Install” and this time browse the SuperSU.zip and flash it.
  7. Reboot your device.
That’s it, now you have rooted your Android One devices which are updated to Android 6.0. :-)
android
With the release of new android i.e. Android 6.0 Marshmallow, Google has introduced a new security feature with it. Now when ever you factory reset your phone with recovery and after reset boot your phone, then the device will ask you to verify your previous Google Account. If you don’t remember it then you can’t have access to the device.
 
The main aim for introducing this security feature is to prevent selling of stolen device. But there’s a trick to bypass this security feature.

Steps to Bypass Android Factory Reset Protection

This guide is reported to be working only on the Samsung Devices. If you found it working on other device then inform us.
  1. After you have done Factory Reset, turn on the phone.
  2. Now when it say to verify your Google Account, connect your phone to computer using OTG cable.
  3. Now when you connect the cable, the device “File Manager” will automatically open up.
  4. Now download and copy the apk and move to your device using computer. Download the apk required for this process from here.
  5. Navigate to the location where the apk is saved on your  device and open it.
  6. Now it will prompt to go to Settings and Enable Unknowns Source. Do it.
  7. Now install the apk and open it.
  8. This application will take you to setting.
  9. Now scroll down to “Backup And Reset”.
  10. Click on “Factory Reset>Reset>Rest All”
  11. The device will reboot, but this time it won’t ask to verify the Google Account.
  12. That’s it. Now you have  Bypass Android Factory Reset Protection.
The reason why it doesn’t ask for verification on after doing factory reset from device setting is that, when your do the factory reset for second time, there’s no Google Account logged in. If you found this method working on any other device, then let us know about it using the comment section. :-)

UPDATE – Check the end of post for the list of devices Listed in 3rd Phase.

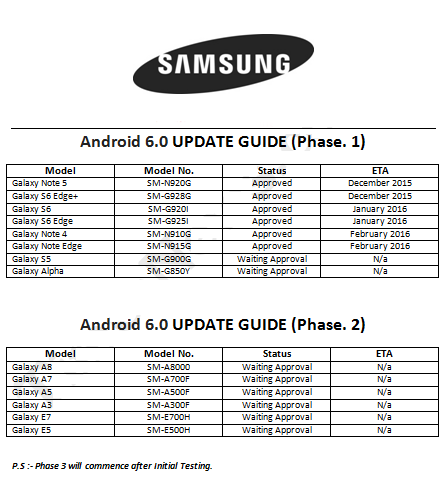
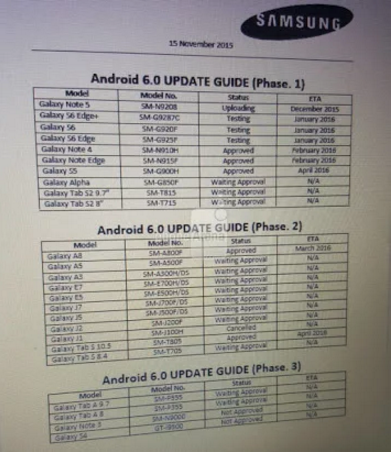
Google has already released the latest android version i.e. Android 6.0 i.e. Marshmallow. Most of the manufacturers has already started rolling out the update, but there no News from Samsung till today. Here’s a leak of the list of devices which will be getting the update to Marshmallow with the ETA of the release.Samsung
As you can see the image, the update will be released in 3 phases. The 3rd phase is still missing.
The devices which will be getting the update in 1st Phase are –
  1. Galaxy Note 5 (SM-N920G) and Galaxy S6 Edge+ (SM-G928G) are approved for the update and the update will be available by December 2015.
  2. Galaxy S6 (SM-G920I) and Galaxy S6 Edge (SM-G925I) are approved for the update and the update will be available by January 2016.
  3. Galaxy Note 4 (SM-N910G) and Galaxy Note Edge (SM-N915G)  are approved for the update and the update will be available by February 2016.
  4. Galaxy S5 (SM-G900G) and Galaxy Alpha (SM-G850Y) are still waiting for the approval.
The devices which are listed in the 2nd phase are –
  1. Galaxy A8 (SM-A8000)
  2. Galaxy A7 (SM-A700F)
  3. Galaxy A5 (SM-A500F)
  4. Galaxy A3 (SM-A300F)
  5. Galaxy E7 (SM-E700H)
  6. Galaxy E5 (SM-E500H)
UPDATE-
Updated list
Updated list

The devices which are listed in the 3rd phase are –

  1. Galaxy Tab A9.7
  2. Galaxy Tab 8
  3. Galaxy Note 3
  4. Galaxy S4
All these devices are still in the waiting list for the approval.
If your device is not listed then it’s not that the update won’t be available for your. The 3rd phase is still missing, so there might be chances of more devices getting added up in list of device getting Marshmallow update.
We all also knows that Android 6.0 comes with many new and exiting features like Doze, Google On Tap, advanced permissions, new Chrome feature, handle Web links in new ways, Android Pay and many more other features. With the update you will also be getting a new RAM manager and the support for USB Type C will also be added.
So whats your opinion about the update. Share them with us using the comment section. :-)
hike direct chat share
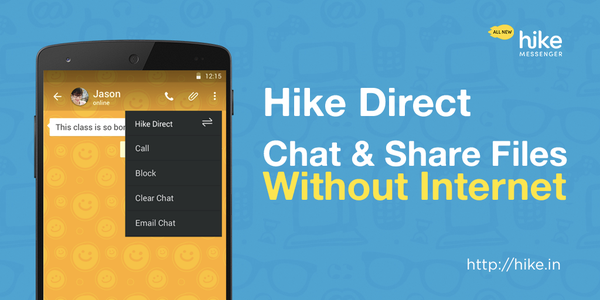
Back in  October 2015, Hike Messenger rolled out its ‘Hike Direct’ feature which allows users to chat and share files without an internet connection (data pack) on the device. Since then, we’ve received a number of queries asking about how the feature is made to work and how far can the two devices be. If you are on the same train of confusion and curiosity, you’re at the right place.


Hike Direct Uses Wi-Fi Direct Technology
Hike makes use of the Wi-Fi direct. So first of all, for easier explanation, here’s what Wikipedia writes about Wi-Fi Direct:
Wi-Fi Direct, initially called Wi-Fi P2P, is a Wi-Fi standard enabling devices to easily connect with each other without requiring a wireless access point. It is useful for everything from internet browsing to file transfer, to communicate with more than one device simultaneously at typical Wi-Fi speeds.
Simply saying, Wi-Fi direct allows a certified device to form a connection between the devices close to it. These days many devices such as printers, cameras; etc make use of Wi-Fi direct for providing a fast and reliable connection between the devices without any need  for internet.
If you know of sharing apps such as SHAREit, that’s exactly what Hike does. Just in a different way that targets chat as its primary feature and media sharing a secondary. Hike creates a peer – to – peer connection over which messages and media are sent and received.
Because this feature makes use of a Wi-Fi connection between the two devices, that’s why it has a maximum reach of 100 meters. Before you’d ask, no this limit cannot be increased unless new developments in the Wi-Fi adapters is made which allow for a smaller module with wider reach.
 

Download Hike Messenger


This method of unlocking your blackberry is a lot
easier and faster than the previous method of
using USB cable.

You need IMEI number of your Blackberry device
which you can get by dialing *#06# on your
phone[15 digit] and Your device PRD which you
can get by
Turning off BlackBerry device

Remove battery.
Look for PRD-XXXXX-XXX number in the white
label on the back.


Select your phone's PRD number from the
dropdown list to display the correct MEP
number.

Ensure the PRD number matches exactly and
your phone Mep number will display directly
under the drop down list box. Now that you have
your Mep number and your IMEI number, it is
time to generate unlock code for your blackberry
device.

TO GET UNLOCK CODE

Visit swens code generator website here
Enter your 15 digit IMEI number without period[. ]
and select your Mep number from MEP drop
down list [the Mep number you first generated
using your PRD number].

Hit on the Get Free Mep Codes and your unlock
code will be displayed along side all other codes
like [MEP1(SIM), MEP2(Network Active),
MEP3(Network Subset), MEP4(Service Provider),
MEP5(Corporate)].

The Mep2 code displayed in red colour under
your IMEI number and Mep number is the unlock
code for your blackberry device.


Microsoft has recently merged the Windows Phone and Windows store. The manual download options seems no longer available and hence this post stands irrelvant going forward. We will update the post if things change.
Although it will still take Windows Phone to reach close to Android or iOS in terms of Market Share, it definitely is the fastest growing mobile ecosystem these days. As it grows, there are more better and graphic intensive apps being delivered to the Windows Phone store to meet up the requirements of the users. If you don’t have access to WiFi, downloading these big apps will be a big pain as Windows Phone does not allow downloading of big apps over Cellular Data connection. If you own a Windows Phone device, you can download the apps to your PC and then transfer them to the phone.

Downloading apps from Windows Phone Store to the PC

Windows Phone store allows the users to directly download the app packages from the store. This is made possible as unlike Android where apps can be side-loaded without using Play Store, the apps on Windows Phone are still required to be installed by logging into a Microsoft Account. Follow the steps below to download the app XAP (or the newer APPX) files to your PC.


  1. Open WindowsPhone.com/en-us/markets
  2. Choose the country in which you are located. If you choose a different country, some apps which are exclusive or are modified to suit your location will not be available. Some apps will also refuse to install on your phone if the regional settings on your phone do not suit the one required by the app.
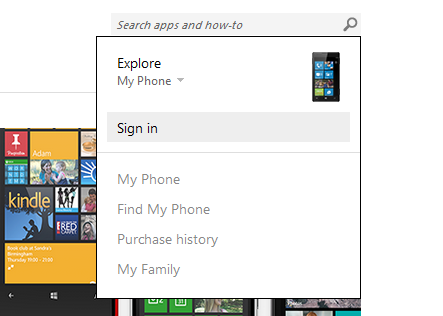
  3. Sign in to your Microsoft account by hovering over Explore in top right and selecting Sign in. You can skip this step, but then some apps will be unavailable for downloading.

    1. signin and search windowsphone
    2. Once signed in, search for the required app by entering the search term into the search box at top right. (Refer to previous image)
    3. On the results screen, click on the app best suited to your search query.
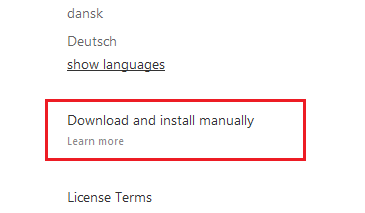
    4. Once on the specific page of the app, scroll down and look for an option called ‘Download and install manually‘ in the left sidebar.
      Download XAP windows phone
    5. Click on it and save the XAP/APPX file hence delivered. That XAP or APPX file is all you need to install the app on your phone.
    Further reading: How to transfer and install this XAP file on a Windows Phone Device

 
HOW TO FLASH/UNBRICK MTK smart phones using SP-FLASH TOOL

SP-FTOOL is just another great alternative tool used for flasing/unbricking MTK mobile phones.

DOWNLOAD:


MTK drivers here

Sp-flashtool here

Download any mtk stock rom here


HOW TO:
  • after your downloads extract the flashtool.
  • now click scater-loading button so that flash process can begin.
  • locate the scatter file of your device, this is located inside the folder of the rom
  • now click on download button
  • power off the device and remove battery, if in-biult, dont border just continue.
  • connect the device to the computer and wait for it to be detected by sp-flashtool
  • when phone is detected, a red progress bar,will be detected.
  • when flashing is completed you will see this..
  • insert battery back into the phone and reboot device...


now you have an unbricked device
All the best
SP FLASH TOOLS LATEST 

HELPFUL USES OF SP-FLASHTOOL
  • Sp flashtool is a tool for flashing complete roms (stock/custom roms)
  • flash just recovery image to phones
  • format mtk Android phones


DOWNLOAD V5.1352.01 HERE
YAGI GIST HUB. Powered by Blogger.

FACEBOOK PAGE

Popular Posts